Hello, DarkC Community!👋
Welcome our long-time fan, Barry Smith. He is the author of this awesome long-read on How to build a successfully balanced deck for your Dark Country game⚖
Today we’ll talk about the basics of deck building and main combos within Dark Country available cards sets. The next article will describe basic decks for each of the factions⚖
Let’s start, then!☠
💬If you are adventurous enough to play an alpha version of a new NFT-based game, we know that you are savvy enough to figure out how to build a deck! Yet not everybody has experience with some of the underlying principles of how to make a good deck. In this article I will go over some of the underlying principles of deck building and in my next article give you some well-rounded decks to use yourself.
These decks will give you a strong base on which to iterate and find the best tournament winning strategies or decks you love to play.
Probabilities🃏
First, we need to discuss a couple of underlying principles of deck building, which can be applied to almost any game with a resource economy.
In Dark Country, an extra mana is added to the player’s available pool and refreshed to spend each turn. This allows for cards with more powerful effects to be played later in the game, after both players have had a chance to develop their strategy.
As such, putting only the most expensive cards in your deck means that several turns could pass where you won’t be able to play any cards. This will often lose you the game before you even begin.
It`s good to have a deck that allows you to play cards which advance your win condition on every turn. This is known as building to a ‘curve’ aka ‘mana curve’.
Sometimes the amount of available mana exceeds the most expensive card in your deck. Which cards to optionally play in these situations is the heart of any good card game. Early plays are usually more defined by specific cards which are your only choice.
Your deck should contain cards that cost all values from 1-X and enough copies of each. This way, you`ll have at least one in your hand on that turn.
Unfortunately, for some, this is going to involve some math. If you want to skip this part then approximate breakdowns of the number of cards to include by mana cost are provided at the end. These can be tweaked to suit your deck and style. On the plus side, most of the hard work has already been done for you!
Let us assume that you want to play a 1-cost card on turn one. The first thing to figure out is the likelihood of seeing a 1-cost card in our opening hand. For this, we want to use Hypergeometric Distribution!
Hypergeometric Distribution allows us to do an important thing. With it, we can calculate the likelihood of pulling particular cards from our deck after we draw a certain number of cards. We need to know:
📍Our Population Size (deck size);
📍Number of Successes in Population (how many 1-cost cards are in the deck);
📍Our Sample Size (how many cards will we have drawn);
📍Desired Number of Successes in Sample (do we want 0, 1, or more).
Thankfully, there is an online calculator to do the actual number-crunching –
Using this calculator, we can see that if our deck is 40 cards and we have three 1-cost cards in our deck (the most of any single card you can include in your deck), going first means we will have only seen 4 cards by turn one. If we only want a single success, then our chances are about 25.5%, as highlighted in the red box.
The figure highlighted in the purple box (27.7%) is the cumulative probability of seeing one or more 1-cost cards, as it is possible that you would draw two or even three in your opening hand. Since you only want a single 1-cost card, then you will get the desired opening hand just 1-in-4 games.
However, this doesn’t take into account the mulligan. For the mulligan you shuffle the cards you don’t want back into the deck and redraw that many cards. That means as the first player you could see up to seven cards before your first play.
This changes how the odds are calculated, giving two effective chances for drawing the card that we want. A full mulligan resets the deck, so you have the exact same chance twice. The first draw (A) and second draw (B) should be assessed as independent events by using ‘P(A or B) = P(A) + P(B) — P(A and B)’. This calculates that either A or B or both A and B occur. In practical terms, you would of course not mulligan the card you wanted if you got it in your first draw.
📍Again, thankfully, there is an online calculator for that — https://www.calculator.net/probability-calculator.html — and you want to look at the ‘P(A∪B)’ value.
This would mean that there is actually a 43.2% chance for drawing your 1-drop using the numbers above (drawing 3 out of 40, then 4 out of 40). This is almost half of your games and as a second player (drawing 4 out of 40, then 5 out of 40) it increases to 52.1%
⚔Who thought there could be so much math in a card game!⚔
The only way to improve those odds is to increase the number of 1-cost cards in your deck or to draw cards faster.
By doubling the number of 1-cost cards in the deck the balance tips the cumulative probability to 69.3% as the first player and 78.5% as the second player (both after a mulligan). Suddenly, you have a turn one play in 4 out of 5 games. Improving that to over 90% requires eleven 1-cost cards in your deck. The opportunity cost of putting that many cheap cards in your deck though is that you won’t have enough strong cards for your later turns.
The same math can be applied for turn two and a 2-cost card, turn three and a 3-cost card and so on. Of course, by turn two you may want to play two 1-cost cards and turn three a 2-cost and a 1-cost. Decks that use synergies and strategies that are ‘off curve’ exist and can’t be accounted for when ‘deckbuilding by the numbers’.
Some decks won’t even want to play a 1-cost card (such as saving cards in hand for an early Owlbear). Some will be willing to sacrifice that early aggression for stronger mid and end-game cards. Remember that every card included in your deck is an opportunity cost for a different card to be added.
As such, there is no ‘perfect’ ratio to put in for each number. But if your deck relies on seeing a particular card on turn four, then you can figure out statistically what the likelihood of that happening. Then you can build a deck that has alternate strategies for the 40–50% of games where you don’t see those cards.
A rough guide to the number of cards to include and the chances of having drawn them (not including a mulligan) are below👇
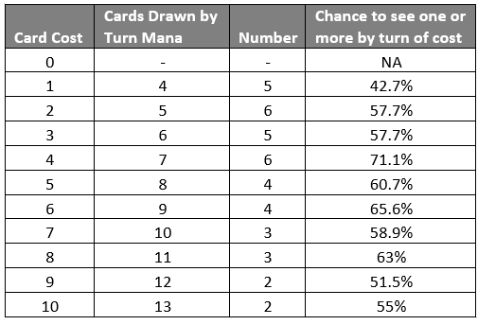
Not every deck is going to include cards of each cost. Thus, use the calculator to adjust your probabilities based on the cards in your deck and try to get a ‘feel’ for when you need more or fewer cards.
Tempo🃏
You might be asking why any of the above is important and to explain that we need to discuss another core concept, tempo. While tempo includes many facets of the game, the first one a new player will encounter is during deck construction.
Tempo can be described as the speed at which you are able to play cards that threaten the opponent (usually in the form of creatures to the board). Maximise that ability with efficient use of ‘temporary resources’. If one player is using all their temporary resources every turn and the other is only using half, then in most scenarios, the first player will defeat the second player.
Temporary resources are ‘use it or lose it’ resources, which regenerate each turn. In Dark Country, the most obvious temporary resource is that of ‘mana’ or the points you have available to spend playing cards on each of your turns.
From the explanation of probabilities above, you might be wondering why it is important to even have a turn-1 play when all the best cards cost a lot more? Tempo is the answer.
If you are unable to play a card until turn 3, then that is two turns in which you are not engaging your opponent and working towards your win condition. You waste 3 mana that could have been used for that purpose, as well as allowing your opponent to advance their win condition.
Even a ‘vanilla’ 1-drop is a 1/1 body, that can deal 2 damage by turn 3, which is 5% of the way to winning the game. A turn 1 ‘1/1’ and turn 2 ‘2/2’ can be 10% of the game by turn 3, not including your turn 3 play. If you haven’t played anything then you are decreasing your chances.
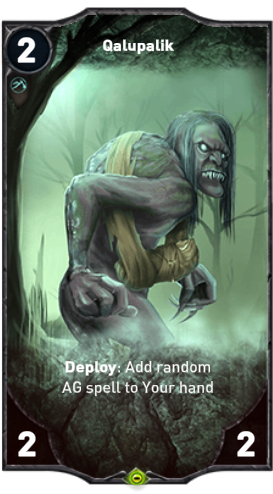
Your early turn-plays can additionally advance your game plan. A Qalupalik will spawn a spell to hand while also being a 2/2 body, maintaining card advantage, or an Owlbear can come out turn 3 as a 6/6 body, dealing large damage. It is obvious that the early game can determine the mid and late-game flow.
Not all cards of their cost want to be played on the turn they can be though.
Cards can be proactive or reactive and if you only have reactive cards, then you may not have something to react to at the corresponding stage of the game.
A proactive card is a card that can be played to further your board state or win condition. It does not rely on your opponent’s actions. These can include creature cards with large attacks or strong defences, such as Fortify. It can also include cards that synergise (interact) with future cards that you want to play, such as the Inspire mechanism.
A reactive card is usually a card that disrupts your opponent’s plays and will damage or remove creatures on their side of the board. There can be some crossover with proactive defensive cards that have abilities like Fatal Strike.
There is a final area to consider, cards with a flexible utility. Again, that includes cards like Liquidator, with both Fortify and Fatal Strike or Archer, which can do 3 damage to an opponent or creature (triggering Inspire if it dies), all in addition to having a 3/5 body.
When building a deck, you must have consideration for the function of your cards and how that’s going to advance your plan to win.
Card Advantage🃏
The next area of tempo to consider is ‘card advantage’.
To play a card, you must first have a card. As the game only gives you one new card per turn, if you play two cards every turn, you will very quickly be ‘top decking’ (only able to play the card you draw that turn).
There are a few ways to avoid this. Firstly, you can play cards that replace themselves, either on deploy or with Last Word effects. These are efficient uses of your temporary resources. They allow you to utilise the mana you get each turn, without sacrificing your choices on future turns.
Secondly, there are utility cards, such as Bless and Offering which draw cards. For these cards, you are again exchanging your temporary mana for more cards in hand. Remember you either use it that turn or don’t, but it does not accumulate any faster if you don’t use it.
Having more cards than your opponent is called having Card Advantage. The player with access to more of their cards will have an improved chance of winning.
This is easy to understand in the context of having proactive and reactive cards and the right card for the current situation. There is no point only having a Brainwash or Incinerate if your opponent has no creatures on the board. Having an alternative proactive play in hand allows you to improve your chance of winning.
Similarly, having a large hand of cards requires your opponent to consider all the possibilities of how you might play next. This can lead to them making mistakes based on assumptions about what card you ‘must’ have in hand.
Card Advantage (CA) is the number of cards you access over your opponent. It can be powerful but there is a secondary consideration. This is Virtual Card Advantage (VCA), which addresses the ‘quality of the cards in your hand.
The benefit of card advantage is having choices about how next to play. Yet if the cards in your hand provide little to no benefit, then your virtual card advantage is worse than your strict card advantage.
When every card in your hand has been drawn from your deck, it is likely they are all cards you wanted to play. Drawing cards is not the only way to generate cards in hand in Dark Country, however. Several cards ‘spawn’ other cards to hand, which helps maintain CA but can reduce your VCA if they are not synergistic or have weak effects.
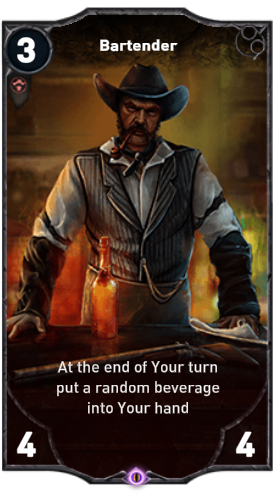
An example of low VCA would be the Ranger card, Bartender. The Bartender puts a random ‘beverage’ card into your hand at the end of the turn, as long as it remains on the board. These beverages cost 0 and can either add 1 to a creature’s attack or health. These can provide surprise opportunities to interfere with your opponent’s plans. But they are not as good as a ‘natural’ card you would include in your deck. They have only a minor effect and when given the choice would never take up one of your 40 slots.
It is worth tracking which cards you know are in your opponent’s hand to evaluate their potential next turn plays. If you can return cards like Mountain Lion to their hand with Pale Nun when they are low on cards or destroy Black Cats after playing Sinful Shepherd, then you are reducing the value of their cards in hand.
A card like Shadow (Last Word: Add a random spell to hand) is worse at generating VCA than Qalupalik (Deploy: Add random Ancestral Guard spell to hand). The reason is that with Shadow, the possibility of adding a non-functional spell from a different faction may happen. Whereas AG spells are only currently from a small number of options. These are already likely in your deck and you want to see.
Board State🃏
One of the final areas of tempo to consider is ‘board state’ (the presence of cards in play).
Creatures and other cards on the board are also temporary resources. Every turn they can deal damage equal to their attack and/or trigger their abilities. Whether that is to damage an opposing hero or opposing creature depends on the situation.
As highlighted in previous sections, there is a lot of value in playing low-value creatures and being able to do damage to your opponent. The more you do, the closer you are to winning, but you also have to be careful not to take too much damage or you will lose.
“Boards don’t hit back.” — Bruce Lee

Bruce Lee is probably most famous for never having played Dark Country because, in this game, they do!
If there are creatures you are unable to deal with, either by removal, rooting, damage reduction, or any other way, then you are going to be taking damage from them next turn.
If your creatures are doing more damage than their creatures, then you can be said to be ahead in board state or behind if not. Often you are looking for the most helpful way to spend your damaging resources. This may mean trading with more powerful creatures on your opponent’s side of the board.
An example of a good, but fair, trade would be a 2/1, 3-cost creature attacking a 5/2, 5-cost creature and both dying.
In this scenario, the player with the smaller and cheaper creature has traded the same number of cards for a +3 per turn damage differential. If instead, the attacker did damage directly to the hero, they would cause them to lose 2 health. But on the opponent’s turn they themselves would lose 5 health.
In some circumstances, such as the killing blow, this is preferential, but in most others trading this way is an opportunity to look for.
For example, the opponent has a 5/5, 5-cost creature, and you have 2x 1/1, 1-cost creatures and a 2-cost 3 damage spell in hand. Attacking with both those creatures and casting the spell to remove it may not be the best trade.
Although you would have spent 4 mana to remove their 5-mana creature it is also costing you 3 cards as opposed to their 1. This is a -2 card exchange. This may sometimes be necessary or desired but has to consider the broader board state. Are there are any cards in hand or deck that can deal with it later while you put down more cards of your own.
If you were able to play a 5/6, 5-cost creature for example, then your opponent would likely have to spend two cards to your one to deal with it. This of course depends on cards already in play.
When playing you are looking for opportunities to play cards that make exchanges unfavourable for your opponent. Also, you want to maximise the damage you can deal.
Okay. Enough basic theory. The more advanced stuff can wait for another day!
Card Evaluation and Deck Strategy🃏
Now we know how many of each card we want to put into our deck and what functions they should have, the tricky part is deciding which!
Deck Archetypes🃏
Card games, like Dark Country, have archetypes of decks that fall into three categories — Aggro, Control, and Mid-range.
Aggro (aggressive) decks attempt to defeat their opponents as fast as possible, often giving up their own health and cards to do so. These decks don’t expect to make it to the late game, so want to win fast. These decks are typified by creatures and spells. They can put out the most damage in the shortest time frame, with cards that are classed as ‘efficient.
Control is the opposite to Aggro and attempts to slow down the game until they can play their most powerful cards to win. A control deck can slow the game down in a few ways. They can remove opponent’s creatures for cheaper than they can play them, including defeating many creatures at once. They can disrupt the opponent’s synergies, by removing cards from their hand or graveyard or not allowing them to get support cards on the board. They can lengthen a game beyond a point Aggro style cards are valuable, by healing life, preventing cards from attacking, or anything else which swings the balance of the game in their favour.
Control decks often rely on a particular combination (combo) of two or more cards to win the game and need to remain alive until both those cards are drawn, and they have enough mana to play them.
Mid-range decks, as the name suggests, fall somewhere between the two. They attempt to play quickly against Control and slow down when playing Aggro. Mid-range decks look for both value plays and reactive plays to combat each type of opponent but sacrifice consistency and some power to be both.
Other deck types exist, either as a combination of the above or with unique, game-specific mechanisms. They are often discussed in the context of the metagame (meta), which identifies what the strongest decks are and how to play against them.
There are other deck styles:
📍 Ramp (uses cards that enable more powerful cards to be played for cheaper/more quickly);
📍 Prison (a very specific type of Control deck that wins by never losing);
📍 Gimmick (a Combo deck that usually can only win by performing an interaction that the opponent doesn’t see coming. They rarely win once the opponent knows how to counter it or requires a ludicrous sequence of cards to pull off).
Gameplan🃏
Each deck archetype tries to win in a different way. Understanding what you want your deck to do and what that means will be critical when it comes to the success of your deck building.
When building an Aggro deck your mana curve is going to be as low as possible, while still enabling you to defeat your opponent. Having a deck consisting of only 1 and 2-cost creatures is not very likely to win. Aggro decks are characterised by identifying:
🔴 value from low-cost creatures (e.g. Owlbear, 2–3 mana for a 6/6 creature);
🔴 ways to keep your hand topped up with card draw (e.g. Broodmother, Deploy: Add two Spiderlings to your hand);
🔴 how to avoid being wiped out by control decks (e.g. Renegade, Last Word: Summon a Cultist Adept).
Each of which is critical when it comes to formulating your strategy.
Control decks have an early game consisting of threats that can:
🔴 ‘trade’ up (e.g. Liquidator, Fortify and Fatal Strike)
🔴 remove (e.g. Vortex, 1/5 creature, Deploy: Attack target creature many times)
🔴 damage reduction (e.g. Poison Dart, Set creatures attack to 1).
The mid-game will consist of things like:
🔴 board wipes (e.g. Sinful Shepherd, 7/7 creature, Deploy: Turn all other creatures into 1/1 Black Cats).
🔴 life gain (e.g. Raining Blood, Destroy creature, heal your hero for its cost)
Until they get their most powerful cards or combo down.
The mid-game will consist of board wipes (e.g. Sinful Shepherd, 7/7 creature, Deploy: Turn all other creatures into 1/1 Black Cats). Until they get their most powerful cards down.
Mid-range decks will combine the two to varying degrees, with the early game consisting of multi-function cards (e.g. Fanatik, 2/1 creature, Frenzy and Deploy: Mute target creature) or ramp (e.g. Executioner, 3 mana, 2/2 creature, Deploy: If every creature in your deck is a cultist, they cost 1 less), while building up to a finisher (e.g. Ritual Master, 6/6 creature, Summon two cultists at the end of your turn).
Understanding what your deck is trying to do and not focusing on doing everything is critical when it comes to being competitive. Both from the card choices going into your deck and understanding how and when to play particular cards during the game.
Card Baselines and Synergy Values🃏
There are a few ways to evaluate a card in any card game but most simply is to look at raw cost vs benefit, before identifying synergies and combos.
Dark Country mostly conforms to vanilla (basic) creature cards cost 1 mana for every point of attack + health that it has. So, 1 mana = a 1/1 creature, 2 mana = a 2/2 creature, and so on. Some cards such as Young Recruit immediately buck that trend, being a 0-cost, 1/1 creature. Those values are readily apparent as being ‘above the curve’.
Other creatures, such as the often-mentioned Owlbear, are not obviously above the curve. It is an 8-cost, 6/6 creature, which seems to be much worse, but its ability that reduces the cost by 1 for every card in your hand means that it is functionally a 2 or 3-cost creature, giving it 2–3 times as much value as a vanilla creature in that slot.
Some cards don’t match their basic value in this way, in which case they need to have a powerful effect to create value. This effect could be to disrupt your opponent’s plan, to ‘buff’ other creatures on your board (thereby making up the value difference), some kind of defensive ability like being immune to spells, or many other effects that make up the gameplay of Dark Country.
One of the most synergistic decks is that of Natives. Many cards have traits in addition to their other values and these traits and Natives are cards that benefit from the Inspire keyword. When card with Inspire is played, a ‘totem’ is created on the table. If a totem is already in play it upgrades by one level. The upgraded version provides buffs to creatures with the Native trait, starting with +1/+1 and ultimately giving it a random ability, such as Guardian.
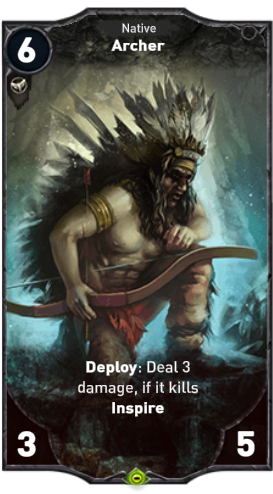
When playing a card with the Inspire keyword it is important to calculate additional benefits you will get from these buffs, even if they are situational. An example card would be Archer, 6-cost, 3/5 creature, Deploy: Deal 3 damage, if it kills Inspire. 6 mana for a 3/5 is not strong on its own, but dealing 3 damage increases its value and utility, but with a basic totem out when it kills a creature the totem will upgrade to give Archer +1/+1 making it 6-cost, 4/6 creature that does 3 damage when deployed.
The tricky part is of course evaluating whether the 3 damage dealt immediately is better than a larger body overall, but in a deck with more Natives (and even without) this becomes a strong consideration for a 6-cost slot in your deck.
The only real way to do this though is by looking at the cards as a whole and opportunities for them to work together as well as regular testing of cards to discover how they work in practise.
Power Cards and Combos🃏
Here is a list of powerful cards and combos to consider when building your deck out of any faction. But there are many more and as new cards are released and incorporated the actual value of these cards may change. Particularly if the meta evolves to a place where their abilities are countered by other cards which provide better value. If you cannot find a synergistic card in your faction, then consider one of these:
2 — Liquidator. This card has Fatal Strike that can trade up if unchecked and Fortify to act as a deterrent to larger creatures.
3 — Fanatik. This card Mutes a problem card that can gain value over time, as well as Frenzy to work as spot removal for smaller creatures.
3 — Vortex. Only a 1/5, which averages out at the 6 points spread across the two stats. But this card and its two big brothers, Hanged Lady and Spectre, can both attack another creature repeatedly on the turn they come down.
4 — Dark Priest. Has the 4/4/4 base value, but at end of turn gains 2 health and deals 2 damage to the enemy hero, making it an effective 4 for a 6/6.
4 — Mountain Lion. Most players will only have played one card per turn by turn 4. So while the 1/1 stats don’t look strong, the +1/+1 for cards in hand make this a potential 5/5 for the cost. Being able to trigger the effect with the 3-cost Wolf makes an even stronger combo in future turns.
5 — Banshee. 3/3 but can destroy any wounded creature. As long as your deck has a way to do at least 1 damage to a card, then this can trade up by destroying it and still having a presence on the board.
6 — Puk-Wudjie. This 5/6 is almost on value but also lets your draw a card (improving card advantage). If the drawn card has the Native trait, reduces the cost of that card by 2 (ramp).
7 — Sinful Shepherd. 7/7 is already fine but is one of the few board wipes in the game, turning every other creature into a 1/1 Black Cat. Knowing when to play this card is very important and it also affects your side of the board, so practise with it to know how to use it optimally.
7 — Ritual Master. While slightly weaker at 6/6, it is another card that generates value over time by summoning two cultists at the end of your turn. This is better than 1/1.
8 — Owlbear. 6/6 but costs 1 fewer mana for every card in your hand, enabling it to be played on turn 2 or 3 consistently.
Neutral Spells🃏
The most important spell card to consider including is The Offering. This 4-cost card draws two cards. They increase your consistency in seeing the cards you want. Also, they help to get more useful cards when your card advantage runs out towards the end of the game.
If you’re making a deck always consider putting 3 of these cards in.
Just Do It!🔥
Based on the above you can try and build a deck out of each of the factions that match each style. Though, some factions are better at a particular style than others. Ancestral Guard is far better at Control than Destructive Horde. The Destructive Horde is far better at Aggro than Ancestral Guard. So, it is important to understand what cards each faction has before building a deck.
What’s next?⚔
That’s it for today! The next article will describe basic decks for each of 4 fractions so that you can jump into a real game right away.💬
About the Author📝
And again, big thanks to Barry Smith. He has been playing (but not always winning) competitive card games for over 25 years. Currently he helps companies bring their brands to the blockchain via his company, NFT Adapt.
Sign up for his YouTube Channel for the latest hands-on experience: NFT-Decree on YouTube.
Follow us on Twitter to keep up with all news!
Originally posted in Dark Country Medium